Rydel Lynch Coachella Makeup Look

Monday, April 18, 2016

Hey guys! Todays post and video is about a makeup look Rydel Lynch wore to Coachella over the weekend. This was a requested look and I thought it would be super fun to recreate.


This look is so fun and if you love glitter you will love this! I used MAC Blues Glitter, MAC Reigning Riches Glitter, and Make Up For Ever Diamond Powder. I wish I had a pink glitter but I still love how this turned out.


I mainly used Colourpop eyeshadows because they are the best for bright shades. I used Slave2Pink all over the eyelid and Ibiza and Luckfully on the lower lash line. For the lower waterline I used DTLA eyeliner by Colourpop. For the inner corner I used Artemis from the Manny MUA x Makeup Geek Palette.

From pictures it looked like she kept the rest of the face pretty simple besides the hearts on one side. I used MAC Hip N' Happy Lip Liner and Charlotte Tilbury Lip Lustre in Hall Of Fame.


I hope you guys enjoyed this look and if you want to see a more in depth video then head over to my youtube channel, BeautyByKmad, or just click the video below!


- Kikki Madison 

Eyes 2 Nails: Glitter Explosion

Wednesday, April 13, 2016

Hey guys! Todays Eyes 2 Nails is super fun and glittery. I love glitter but I never use it in looks so I was super excited for this look.

The main focus of my look was MAC's Reflects Teal Glitter. When you see the glitter sitting in the packaging it is kinda blah but when you put it on your eyelids its incredible. One thing to keep in mind is that glitter tends to get everywhere when applying so I would suggest applying your foundation after you are done with your eyes.


I used the shades Beaches & Cream, Sora, and Frappe from the Manny MUA x Makeup Geek Palette for the crease. I used two Makeup Geek foiled eyeshadows in Houdini and Center Stage over the eyelid to give a base color for the glitter.

Left: Houdini
Right: Center Stage 

Manny MUA x Makeup Geek Palette 
To apply the MAC Reflects Teal I sprayed a flat brush with Fix+. I would suggest getting a glitter base because it will help with fall out.

MAC Reflects Teal 
For the lower lash line I wanted to keep it pretty simple. I used DTLA liner by Colourpop on my lower water line and I used Luckyfully by Colourpop on the lower lash line.
DTLA Liner by Colourpop 

Lucky fully by Colourpop
I hope you enjoyed this weeks look and don't forget to head over to 25 Sweetpea's blog to see her nail look! I love what she did! It is so fun and glittery!
Check out her blog post! 


If you want to see an in depth video of the look I created: 


-Kikki Madison 


Eyes 2 Nails: Fashion Blogger Inspired

Wednesday, April 6, 2016

Hey guys! For those of you who don't know every Wednesday since February I have uploaded a video series in collaboration with my friend 25 Sweetpeas. I love this series and we both thought that I should start blogging about the makeup looks I do and like normal 25 Sweetpeas will be blogging about her nail look.

This weeks look is inspired by Melanie Pace who is best known as a Fashion Stylist. 25 Sweetpeas actually saw this look and sent it to me and we both knew we had to do a look inspired by it.... if you want to see the look we were inspired by check it out here: https://www.instagram.com/p/zDF-Piv1IU/?taken-by=melaniepace21

I really wanted to keep this look light and fun for summer and add in some pops of color. I used Manny MUA X Makeup Geek Palette, Colourpop's Dare eyeshadow, and Colourpop's lippie stix in Toucan.

Toucan Lippie Stix

Dare Eyeshadow

Manny MUA x Makeup Geek Palette 

I really wanted to keep the top eyelid neutral and add a pop of color with the Dare eyeshadow. I highly recommend Colourpop eyeshadows if you want to add some fun and colorful shadows to your look for summer! Also I wanted the lips to stand out so I had to do something pink and bright. I chose toucan because it is the perfect bright pink coral shade.


I hope you all enjoyed this weeks look and don't forget to head over to 25 Sweetpeas blog to see how she achieved these nails: http://www.25sweetpeas.com/2016/04/eyes-2-nails-fashion-blogger-inspired.html 
I also did a video that goes a little bit more in depth incase you wanted to see that: 


-Kikki Madison


#Alchemy Jaime King x Colourpop Collection Review

Monday, April 4, 2016

Hey guys! I first want to apologize for not having a video or blog post up last Monday. Last week was super busy with easter that I really didn't want to post something that I wasn't happy with. But I am so excited that this weekend was very chill and I am able to post this week!

I am not going to lie and say that when I first saw pictures of this collection I was blown away..... BUT after seeing swatches on the Colourpop Snapchat I couldn't wait to get my hands on this collection! I had instagram notifications and twitter notifications on so I could get it right as it went on sale.


 I am first going to talk about the three super shock cheek products. I decided that I would get the bundle of three super shock cheek products and the three super shock eyeshadows. The cheek products came in an eyeshadow size instead of the normal cheek size. I did not realize when filming my video that Golden Child is actually a cheek product..... I use it as an eyeshadow because as a highlight it would not work for me but thats why I love these products because they are so versatile. Honestly, I bought these for traveling and on the go touch ups but I will be purchasing the full size versions because I love how both of them look on! The highlight in Pretty Bonnes is gorgeous and gives a really nice natural glow. The blush in Thammes is my go to right now and the perfect color for spring and summer. Golden Child is intended to be a highlight and would be perfect for somebody with a darker complexion but for me it is an amazing eyeshadow.
Pretty Bonnes
Golden Child
Thammes

The three super shock eyeshadows are also some of my favorite colors colourpop has come out with. I love neutral shadows so these three are perfect for me. The first one is Alchemy and it is a glitter sheer. It is a brand new finish to the Colourpop range and I really hope they come out with more because it is GORGEOUS. Also I found that there was barely any fall out which is amazing for a glitter product. Vanity Fair has to be my favorite out of the whole collection. It is my go to shade and you can just put it on your lid and blend it out and you are good to go. Knight is a satin black and is amazing for smudging. I love putting this shadow around my lash line and smudging it out for an added extra smokey effect.
Alchemy
Vanity Fair
Knight
 The final two products I purchased from the collection are brand new to the Colourpop line. They are contour stix and I was soon excited to get these and test these out. I really am not impressed with the contour stix in New Renaissance. It is too dark for me and goes patchy when I apply it. I have tried multiple ways of applying it and it just looks really bad on me. The contour stix in Releve, which is a highlight, is really pretty and when blended out it gives a nice highlight. It isn't super intense, which is nice because sometimes you don't want something super intense.

New Renaissance and Releve 

My final thoughts on the collection is there are some must have products and some products that I would maybe skip out on. Also the lip products look gorgeous but I have so many Colourpop lippie stix that I haven't even used so I couldn't justify buying more.

If you want to see me swatch all of these products and me using some of the products then watch my video below! 


I hope you guys enjoyed this review and let me know if you got anything from this collection!
-Kikki Madison


Rydel Lynch Inspired Makeup Look

Monday, March 21, 2016

Hey guys. So for todays video I decided I was going to do a look inspired by Rydel Lynch. She makes up 1/5th of the band R5, which they have just finished up their Sometime Last Night World Tour. I was able to go see them twice, once in Orange Park, Florida and once in Orlando, Florida. Both times they were absolutely amazing and I cannot wait for the next album and tour.

During the tour Rydel had some amazing makeup looks that I really wanted to recreate but I decided on this one https://www.instagram.com/p/BC_qeN-jdA8/?taken-by=rydelr5. I love how she put the pink under her brow and how the green and black eyeshadows were smoked out into a cat eye look. Another one of my favorite looks she did was in Orlando. She had crystals following the wing of her eyeliner and under her lower lash line.

I mainly used Urban Decay products for this look because they have the best range of colors when it comes to eyeliner. Also in the instagram picture that I am going off of for reference she tagged Urban Decay so I figured she used mainly UD.

So first thing I did was prime my face and my eyelids. If you want you can do your foundation first but for me I chose to wait until after the eyes were almost done that way cleaning up fall out is effortless and no wiping away your foundation. Before starting eyeshadow I decided to do my eyebrows. I first used an angled brush and some of the 24/7 eyeliner pencil in woodstock to outline where I wanted the pink to be. I found this to be easier than just completely free handing with the pencil. Once I had most of the outline done I went back over with the pencil and then with the eyeshadow in savage from the Electric Palette from Urban Decay.

Top Left: Urban Decay 24/7 Eyeliner in Woodstock
Bottom Left: Anastasia Beverly Hills Brow Definer in Taupe 
Right: Savage Eyeshadow from the Electric Palette by Urban Decay
For the eyes I really wanted the wing to be sharp so I used tape. I would recommend putting the strip of tape on the back of your hand a couple of times before you apply it to your eye so it doesn't tug when removing. For the transition shades I used Beaches and Cream, Sora, and Frappe which are all Makeup Geek eyeshadows.

Manny MUA x Makeup Geek Palette
I wanted to use a lighter shade to really define the wing before using a black eyeshadow incase I wanted to change something. I decided to use password from the Naked Smoky Palette by Urban Decay. Once I was happy with how the wing looked I used Blackout from the Gwen Stefani x Urban Decay Palette.

Top Row: Urban Decay Naked Smoky Palette 
Bottom Row: Gwen Stefani x Urban Decay 
I wasn't sure what products she used but from the picture the black shadow looked like it had some type of glitter or sparkle. To achieve the sparkle I used Moondust Eyeshadow by Urban Decay in Zodiac. You can use this eyeshadow wet or dry but I decided to use the shadow dry. I have found that if you spray your brush with fix+ or the All Nighter Spray from Urban Decay it helps with fall out. For the inner corner and eyelid I used Freak from the Electric Palette by Urban Decay. I have never used this shadow before and I love it! You do have to build up the shadow but it really isn't a big deal. 

Top Row: Moondust Eyeshadow by Urban Decay in the shade Zodiac
Bottom Row: Freak Eyeshadow from the Electric Palette by Urban Decay
The next step is to line your top and bottom water line. Also line your top lash line. I used the 24/7 Velvet Glide-On Pencil in Black Velvet. After this step I do my foundation, concealer, powder, and contour.

24/7 Velvet Glide-On Eye Pencil in Black Velvet 
The lower lash line is super easy. Basically all I did was take Frappe as the base. Then I added Password over Frappe just to darken the lower lash line a little. Finally I used Freak in the inner corner and blended into Password and Frappe. After this is done I curl my lashes and put on mascara on my top and bottom lashes. I use Dior DIORSHOW Mascara for my top lashes and Clinique Bottom Lash Mascara for my bottom lashes.

Top Row: Clinique Bottom Lash Mascara
Bottom Row: Dior DIORSHOW Mascara 
Now my favorite part is highlighting so obviously I did not skip this step! I used my favorite highlight, which is by Anastasia Beverly Hills in the shade Starlight. It is perfect for my pale skin! i also decided to add a little blush because I felt like my skin needed a little color. I used a NARS blush..... could not tell you the name for the life of me.

Top Row: NARS Blush from the Guy Bourdin Holiday Palette
Bottom Row: Anastasia Beverly Hills Illuminator in Starlight
The finally step is lipstick. I decided a nude shade would be best for me because of how intense my eyeshadow was. I use the Kylie Lip Kit in KoKo K. This is my favorite lip kit out of all 7.

Kylie Lip Kit in Koko K
This is the final look.


I hope you all enjoyed this look! I am so happy with how it turned out. I have loved how Rydel has done her makeup on this tour and I knew I would have to recreate on of the looks. If you want to check out the video I made for this look then you can head over to my Youtube Channel.


See you next week! 
- Kikki Madison 


My Everyday Makeup Routine

Monday, March 14, 2016

Hey guys! So today I thought I would share my everyday makeup routine. I also decided to do a YouTube video showing you how I apply everything.

So first up I always prime my face. The primer I use is theHourglass Veil Mineral Primer. A primer is so important because it acts as a base for the foundation to stick to and helps it last longer. My go to foundation right now is the Givenchy Teint Couture Foundation in the color 1 Elegant Porcelain. This is the first foundation I have found that actually matches me. Normally foundations are too yellow or too pink, so I was so excited when I found this foundation. Next I conceal any blemishes I may have and for that I use NARS Radiant Creamy Concealer in the color Chantilly. Finally, I powder my face using the Laura Mercier Translucent Setting Powder.

Top Row: Hourglass Veil Mineral Primer and Givenchy Teint Couture Foundation
Bottom Row: NARS Radiant Creamy Concealer and Translucent Loose Setting Powder

Once I have finished my foundation and everything I attempt to do something with my brows. Right now they are crazy and I need to get them waxed. My go to brow product when I need to be fast ( or to just be lazy ) is the Benefit Gimmie Brow in Light/Medium.

Benefit Gimmie Brow in Light/Medium
Now I will move onto my eyelashes. I will curl my lashes and then use my Clinique Bottom Lash Mascara in 01 Black for bottom lashes. I always do my bottom lashes first. I have no clue why but it works for me. I let my bottom lashes dry and then I will use my DIOR Diorshow Mascara in Black 090 on my top lashes.

Top Row: Clinique Bottom Lash Mascara
Bottom Row: DIOR Diorshow Mascara
After all of that is done I debate whether I want to contour and add blush or not. Even if I don't contour or add blush I almost always highlight. Highlight is just so pretty so how could I not highlight!? For contouring I use the Anastasia Beverly Hills Contour Kit in Light to Medium. The shade I use out of the kit is Fawn. It is the perfect shade for me. For blush I always use a shade by NARS called Sex Fantasy. It was in the Virtual Domination Cheek Palette for the holidays a couple of years ago. Sadly this is not available anymore, at least to my knowledge. For highlight I use BECCA Shimmering Skin Perfector Pressed in Moonstone.


Top Left: Anastasia Beverly Hills Contour Kit in Light to Medium
Bottom Left: NARS Virtual Domination Cheek Palette
Right: BECCA Shimmering Skin Perfector Pressed in Moonstone 
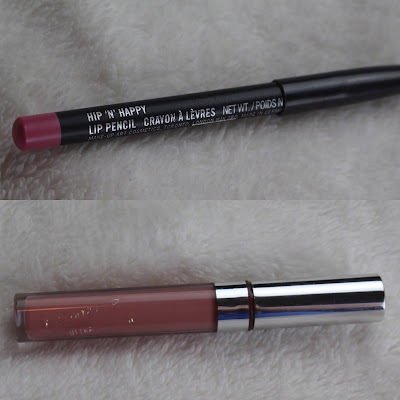
Finally I figure what lipstick I am going to use. Most days I use MAC Hip N' Happy Lip Liner to line my lips and then I use ColourPop Ultra Matte Liquid Lipstick in Midi over the lip liner. This is my perfect nude shade. I need to buy 6 of this color so I have one in every purse and one in my car.... that is how much I use this color haha.
Top Row: MAC Hip N' Happy Lip Liner
Bottom Row: ColourPop Ultra Matte Liquid Lipstick in Midi
So that is my everyday makeup routine! I try to keep it pretty easy and quick just incase I am running late. If you want to see me actually apply the makeup then head over to my youtube channel to check it out!


See you next week! 
- Kikki Madison

Review on Ultra Satin Lips by Colourpop

Monday, March 7, 2016

Hey guys! Welcome to my brand new blog! I thought for my first post I would talk about a new product from Colourpop Cosmetics. On February 25th Colourpop launched 16 Ultra Satin Lips. I love the Ultra Matte Lips so I was really excited to try these and let me tell you they did not let me down. I purchased Magic WandThe Rabbit, and Marshmallow. One thing to remember is these are not the ultra matte liquid lipsticks, they will transfer, they should not be drying like a traditional liquid lipstick, but they should last longer than a regular lipstick.
Ultra Satin Lip in the shade Magic Wand
Magic Wand is my least favorite out of the three. Nothing is wrong with the formula or how it wears, it's just how the color looks on me. I have very fair skin so this just is not the nude for me. I am still going to play around with it and see if different lip liners will help.
Ultra Satin Lip in the shade Marshmallow 
Marshmallow was the shade that I was the most excited to try. It is so different and unlike anything I have in my lippie collection. This color is described on the website as a greyed out lavender and is soon gorgeous. It doesn't make my teeth look yellow which was one of the concerns I had with this color. I would also recommend purchasing the Marshmallow Pencil because finding a lipliner to match may be a little hard.
Ultra Satin Lip in the shade The Rabbit 
The Rabbit is my absolute favorite out of all three shades. It is a really pretty fuchsia with a blue sheen which makes your teeth look white. One thing about this shade is that when you go to take it off it does stain your lips a little. It's not awful but that is one thing to keep in mind. This is the perfect color for spring and summer and I can already tell I will be wearing this a lot.

The packaging the lippies come in.

Ok, so my final thoughts on the Ultra Satin Lips are that I am very happy with the formula, the wear, the range of colors, and the price. I mean $6 for a lipstick is a pretty good deal and lets you experiment with different colors rather than spending $20 on one lipstick at Sephora. Also Colourpop is pretty fast with shipping and I have never had any problems with them. 

If you have any suggestions for my next blog post either leave a comment or tweet me. I would love to hear from you! I am going to try and post every Monday. I will see you guys next week and don't forget to check out my twitterinstagramyoutube, and add me on snapchat @kmadison123. 

See you next week!
Kikki Madison


FREE BLOGGER TEMPLATE BY DESIGNER BLOGS